Single Sign-On - SAML
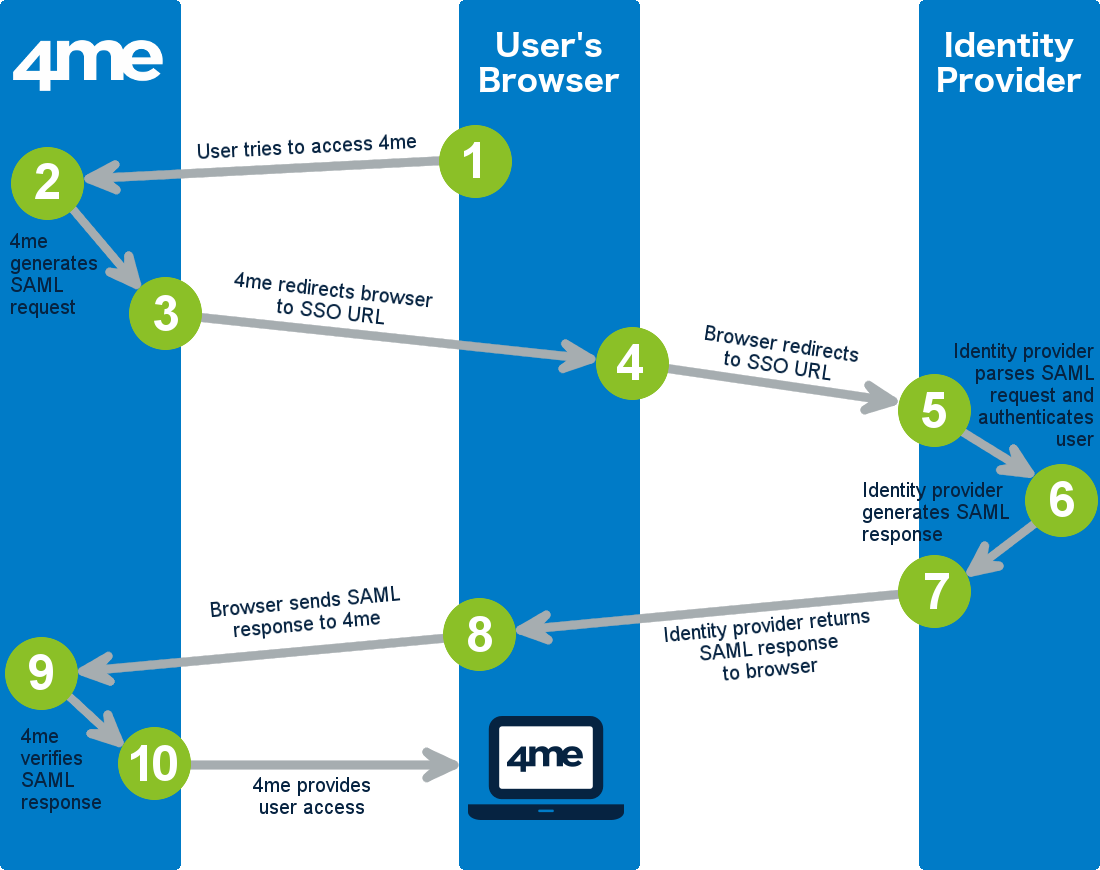
SAML Single Sign-On Transaction Steps

The image above illustrates the following 10 steps that complete one SAML-based SSO transaction:
-
The user attempts to access the Xurrent account of his/her organization using a browser application such as Microsoft Internet Explorer, Google Chrome, etc.
-
Xurrent looks up the settings of the Xurrent account of the user’s organization and sees that SSO has been configured in this account. That is why, rather than prompting the user for an email address and password, Xurrent generates a SAML authentication request. Xurrent then encodes this SAML authentication request and embeds it into a redirect URL that is intended for the SSO service of the identity provider that the user’s organization uses. Also embedded in the redirect URL is the encoded destination URL within the Xurrent account that the user is trying to reach.
-
Xurrent sends the redirect URL to the user’s browser.
-
The user’s browser redirects to identity provider’s SSO service.
-
The identity provider decodes the SAML request and extracts the destination URL. The identity provider then authenticates the user.
-
The identity provider generates a SAML response that contains the authenticated email address of the user and the destination URL. In accordance with the SAML 2.0 specification, this response is digitally signed with the identity provider’s public and private DSA/RSA keys.
-
The identity provider encodes the SAML response along with the user’s email address and destination URL, and provides a mechanism so that the user’s browser will forward this information to Xurrent.
-
The user’s browser forwards the encoded information to Xurrent.
-
Xurrent verifies the SAML response using the SHA1 fingerprint of the identity provider’s SAML certificate. If the SAML response includes just-in-time provisioning attributes, the JIT End User Access Provisioning functionality is triggered to automatically generate a new person record if one does not yet exist with the user’s email address, or to automatically update the user’s person record in Xurrent.
-
If the SAML response is successfully verified, and the necessary just-in-time provisioning actions have been completed successfully, Xurrent redirects the user to the destination URL within the Xurrent account of the user’s organization. The user is now logged in to Xurrent.
How to Enable SAML SSO for Xurrent
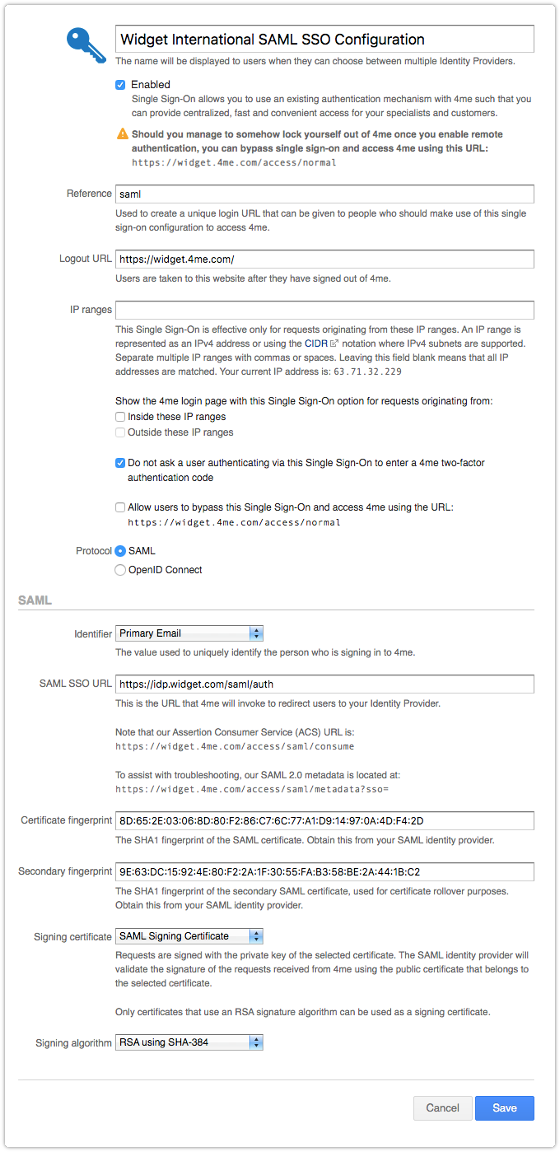
To make SAML SSO work for an organization’s Xurrent account, the Xurrent account owner will need the following information:
-
the remote login URL of the organization’s identity provider (also known as the SAML Single Sign-On URL),
-
the SHA1 fingerprint of the identity provider’s SAML certificate.
This information can then be entered by the Xurrent account owner in the Single Sign-On section of the Settings console.

Once SSO has been enabled, the account owner can check whether it works by logging out of Xurrent and subsequently trying to access Xurrent again by going to the URL of the Xurrent account. If the account owner is already logged in to the identity provider, Xurrent nor the identity provider should no longer ask for an email address and password. Instead, the account owner is directly taken to the Xurrent inbox.
Authentication ID
In case the Identity Provider is unable to provide the email address, or in the rare case that users are allowed to specify their email address without any validation that they own that email address, it is possible to identify a person using the Authentication ID attribute. Be sure to populate the Authentication ID for all people in your account and select the Authentication ID option from the Identifier dropdown in the Single Sign-On configuration of Xurrent. When that unique identifier is passed in the NameID attribute of the SAML response to Xurrent, that value is used to lookup the corresponding person record.
Secure Hash Algorithm
The following secure hash algorithms are supported by Xurrent:
- SHA-1
- SHA-256
- SHA-384
- SHA-512
